Le 03/02/2025
rédigé par Laura P
Nos clients ont du talent : les kits vitres teintées
Les meilleures réalisations de nos clients
Chez Variance Auto, nous sommes fiers de nos clients et de leurs projets sans cesse plus créatifs et inspirants. Aujourd’hui, nous mettons en avant leurs plus belles réalisations en matière de vitres teintées ! Curieux d’en savoir plus ? Suivez le guide ! 👇

Les kits vitres teintées, l’élégance et le confort au rendez-vous 🕶️
Les vitres teintées ne sont pas seulement esthétiques, elles apportent aussi un vrai confort au quotidien. Et voici pourquoi nos clients les plébiscitent :
- Protection contre les UV en réduisant l’exposition aux rayons nocifs et préservez votre peau ;
- Confort thermique en diminuant la chaleur dans l’habitacle, même en plein été durant la canicule ;
- Intimité renforcée grâce à un espace plus confidentiel depuis l'extérieur ;
- Style affirmé grâce à un look élégant et moderne en un clin d’œil.
Comment choisir votre kit vitres teintées ?
Le choix du film teinté est une étape clé pour personnaliser votre véhicule tout en respectant les normes légales.
- Sélection du film : Choisissez parmi une gamme de teintes (légère, moyenne ou foncée) en fonction de vos préférences et des réglementations gouvernementales. Notre équipe est également disponible pour vous conseiller sur les options les plus adaptées à votre véhicule et à vos besoins (protection UV, intimité, style) ;
- Découpe sur mesure : Votre film vitres teintées est découpé aux dimensions exactes de chaque vitre (pare-brise, vitres latérales, lunette arrière) grâce à nos nombreux patrons dans nos locaux ;
- Thermoformage pour une pose simplifiée : Votre kit vires teintées est thermoformer dans nos locaux sur un modèle identique à votre voiture afin de le rendre plus malléable durant sa pose.
Comment poser votre kit vitres teintées ?
La pose d’un kit vitres teintées est un processus qui nécessite précision et patience. Voici un guide détaillé des étapes pour vous aider à garantir un résultat professionnel et durable. 🚗✨
Étape 1 : Préparation des vitres 🧼
Avant toute chose, il est essentiel de préparer votre vitre. Cette étape est cruciale pour assurer une adhérence parfaite du film.
- Préparation des vitres : Vaporisez de l’eau savonneuse sur les deux faces de la vitre pour éliminer toutes les impuretés. Retirez également tout autocollant présent sur le vitrage ;
- Séchage minutieux : Essuyez soigneusement la vitre et les garnitures avec un chiffon propre et doux ou une peau de chamois, en insistant sur les bords et les angles. Passez un tampon d’essuyage pour éliminer les particules de poussière résiduelles. Cette étape est cruciale pour une pose réussie !.
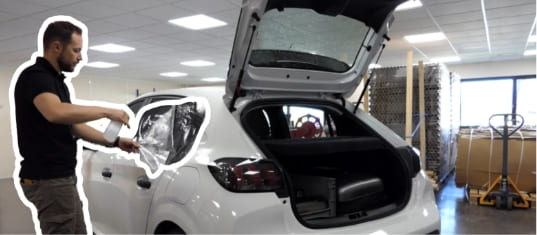
Étape 2 : Application du film teinté 🖌️
C’est le moment clé où le film est posé sur vos vitres. Pour un résultat sans bulles ni plis, suivez nos conseils :
- Retrait de la pellicule protectrice : Appliquez deux morceaux de scotch de chaque côté d’un coin du film teinté auto, puis tirez doucement tout en pulvérisant généreusement de la solution savonneuse sur le film pour préserver la colle. Mouillez abondamment la vitre côté intérieur où sera appliqué le film ;
- Positionnement du film : Vaporisez la face externe du film avec la solution savonneuse. Saisissez le film aux extrémités et placez-le sur la vitre intérieure côté encollé. Ajustez-le aux contours de votre vitre ;
- Marouflage pour une finition parfaite : Commencez par lisser le film en réalisant une bande au centre de la vitre, puis marouflez progressivement vers les bords jusqu'au extrémités pour éliminer les bulles d’air avec une maroufle ;
- Ajustement final : Baissez la vitre d’environ 3 cm et retirez partiellement le film teinté en conservant environ 10 cm. Faites glisser le film de manière à le positionner avec un retrait de 2 mm par rapport à l’arrondi du vitrage. Si besoin, humidifiez à nouveau le film et la vitre pour faciliter le repositionnement. Marouflez horizontalement ;
- Finitions : Remontez la vitre, mouillez abondamment la partie non filmée et retirez la pellicule de protection. Utilisez une palette pour écarter le joint lécheur et insérer le film correctement. Marouflez la partie basse et passez la raclette à l’intérieur des joints pour parfaire l’installation.
Étape 3 : Finitions et contrôle 🔍
Une fois le film teinté appliqué, assurez-vous que chaque détail soit parfait.
- Séchage : Le film est laissé à sécher pendant 24 à 48 heures pour garantir une adhérence optimale :
- Inspection visuelle : Vérifiez qu’il n’y a ni bulles, ni plis, ni défauts d’alignement.
💡Bon à savoir : Pour que votre kit vitres teintées dure dans le temps, voici quelques conseils à suivre :
- Évitez de baisser les vitres pendant les 48 premières heures après la pose pour laisser le film bien adhérer ;
- Utilisez des produits de nettoyage doux et non abrasifs pour l’entretien ;
- Évitez les nettoyeurs haute pression comme les rouleaux automatiques.
💡Nos tutoriels vidéos pour tout savoir sur le covering et les vitres teintées 🎥
Chez Variance Auto, nous croyons en la transmission de savoir-faire. C’est pourquoi nous mettons à votre disposition des tutoriels vidéos sur nos réseaux sociaux ! Instagram, Facebook, YouTube et TikTok : retrouvez-nous pour des conseils et astuces supplémentaires. Voici ce que vous y découvrirez :
- Des démonstrations pas à pas pour comprendre la pose et l’entretien ;
- Les erreurs à éviter pour un résultat parfait ;
- Des idées créatives pour personnaliser votre véhicule.
N’hésitez pas à nous suivre et à interagir avec nous en commentaire. Nous adorons échanger avec vous ! 💬
Nos clients ont du talent !


Rejoignez nos clients et franchissez le pas de la transformation ! ✨
Les vitres teintées sont une option abordable et durable pour embellir votre véhicule. Avec nos conseils et tutoriels, vous disposez de toutes les ressources nécessaires pour mener à bien votre projet. Alors, prêt à sauter le pas ?
Contactez-nous dès maintenant pour un devis ou explorez nos réseaux sociaux pour encore plus d’inspiration ! 🚀
D'autres problématiques en rapport
-

Comment voyager en toute sécurité pendant votre road trip en van ?
-

Comment poser des vitres teintées sans montant sur mon auto ?
-

La pose de vitres teintées, pourquoi Blog-Moteur a fait appel à nous
-

Les films teintés plus performants que les vitres teintées d'origine
-

Films teintés à la découpe colorés pour vitres auto : soyez unique !