Le 27/03/2025
rédigé par Laura P
Le kit vitres teintées : avantages, faire le bon choix et réglementation
Le kit vitres teintées : la solution idéale pour protéger et personnaliser ta voiture
Les kits vitres teintées sont la solution idéale pour améliorer l’esthétique de ta voiture tout en te protégeant des rayons du soleil et des regards indiscrets. Mais comment bien choisir son film teinté et respecter la reglementation ? Découvre tout ce qu’il te faut savoir pour faire le bon choix.

Pourquoi choisir un kit vitres teintées ?
Les kits vitres teintées sont un excellent choix si tu veux allier confort et esthétisme sur ta voiture. En effet, les kits vitres teintées comportent de nombreux avantages. Faisons un tour d'horizon de plus importants :
- Une protection efficace contre la chaleur lors de la saison estivale : si tu n'aimes pas utiliser la climatisation, mais que tu ne supportes pas non plus la chaleur suffocante lors d'une canicule, le kit vitres teintées est idéal ;
- Une protection contre le vandalisme : un kit vitres teintées assombrit le contenu de ta voiture. De ce fait, un potentiel voleur n'aura pas assez de visibilité sur l'intérieur de ton véhicule et laissera tomber son idée de le vandaliser ;
- Un nouvel esthétisme : le kit vitres teintées est parfait si tu souhaites un aspect moderne ou alors une allure plus sportive. C'est à toi de décider quel style tu veux donner à ta voiture.
Ces nombreux avantages font des kits vitres teintées un produit de grande nécessité et très populaire.

Les différents types de kits vitres teintées
Chez Variance Auto, nous te proposons une large gamme de kits vitres teintées.
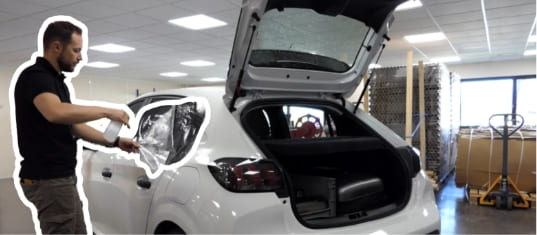
1. Le kit vitre teintée pré-découpé et thermoformé : adaptés à chaque modèle de véhicule
Chaque dimension de vitre est enregistrée dans notre logiciel de découpe, directement relié à notre machine. Ce système te garantit une découpe sur-mesure, au millimètre près. Ensuite, ton kit vitres teintées est thermoformé. Mais, le thermoformage, c’est quoi ? Nos experts maîtrisent cette technique essentielle, qui consiste à chauffer le kit vitres teintées pour qu’il épouse parfaitement la forme de ta vitre. Sans cette mise en forme, la pose serait bien plus complexe !
2. Le kit vitres teintées en rouleaux : à découper toi-même
Le kit vitres teintées à la découpe sera à découper et ajuster par toi-même, aux dimensions de tes vitres. Un kit vitres teintées en rouleaux est une solution souvent plus abordable économiquement. Toutefois, il demande une pose plus technique. Une bonne maîtrise de la découpe et de la pose est nécessaire pour éviter les défauts.

Comment bien choisir ton kit vitres teintées ?
Chez Variance Auto, nos kits vitres teintées sont disponibles en plusieurs teintes, du noir très clair au noir foncé. Plus la teinte est foncée, plus l’efficacité du film est élevée.
- Le noir très foncé : laisse passer seulement 5 % de lumière et rejette 64 % de la chaleur ;
- Le noir foncé : laisse pénétrer 19 % de luminosité et rejette 54 % de la chaleur ;
- Le noir standard : transmet 25 % de lumière et rejette 51 % de l’énergie solaire ;
- Le noir clair : assure un passage de 36 % de luminosité et rejette 44 % de la chaleur.
Quelle est la réglementation (décret 2016-448) actuelle ?
- Les vitres avant doivent laisser passer au moins 70 % de lumière ;
- Les vitres arrière peuvent être plus teintées, tant qu’elles assurent une bonne visibilité pour les passagers et les autres usagers de la route.
En cas de non-conformité avec la législation en vigueur, voici ce que tu peux encourir :
- Une amende forfaitaire : une contravention de 135 € ;
- Un retrait de points : 3 points en moins sur votre permis de conduire ;
- Une obligation de mise en conformité : les forces de l’ordre peuvent vous demander de retirer le kit vitre teintée immédiatement ou dans un délai imparti ;
- Une immobilisation du véhicule : si la visibilité est trop réduite, votre voiture peut être immobilisée jusqu’à la mise en conformité.
FAQ - Le kit vitres teintées
1. Quelle est la réglementation actuelle sur les vitres teintées ?
Depuis 2017, la loi impose que les vitres avant laissent passer au minimum 70 % de lumière visible. Il est impératif de choisir un film respectant ce seuil pour être en règle.
2. Quels sont les avantages des kits Variance Auto ?
Nos kits sont prédécoupés et thermoformés sur mesure pour ton véhicule. Ils assurent une pose simplifiée, une finition professionnelle sans bulles et une protection optimale contre la chaleur et les UV.
3. Comment choisir le kit adapté à mon véhicule ?
Utilise notre configurateur en ligne en sélectionnant la marque, le modèle et la carrosserie de ta voiture. Si ton modèle est spécifique, opte pour notre film teinté à la découpe.
4. Est-il possible de poser les films soi-même ?
Oui, absolument. Nous mettons à ta disposition des notices de pose détaillées et des tutoriels vidéo pour te guider pas à pas, même si tu débutes.
5. Quels sont les principaux bénéfices à teinter mes vitres ?
Outre l'esthétique, les vitres teintées filtrent efficacement les rayons UV, réduisent la chaleur dans l'habitacle, limitent l'éblouissement des passagers et renforcent la sécurité du vitrage en cas de bris de glace.
En résumé, équiper ton véhicule d’un kit vitres teintées est une solution idéale pour allier esthétique, confort thermique et protection contre les UV. Grâce à la précision et à la facilité de pose de nos kits prédécoupés, transformer l’allure de ta voiture n'a jamais été aussi accessible. N'attende plus pour offrir à ton véhicule le style et la protection qu'il mérite !
Mis à jour le 06/05/2026.
D'autres problématiques en rapport
-

Quels sont les avantages des vitres teintées ?
-

Chaleur en voiture : Pourquoi les pare-soleil classiques ne protègent pas tes enfants
-

Films teintés à la découpe colorés pour vitres auto : soyez unique !
-

Comment choisir sa teinte de films teintés voiture ?
-

Nos kits film teinté prédécoupés et thermoformés