Le 29/10/2025
rédigé par Laura P
Pose solo vs pose à deux : erreurs fréquentes et comment les rattraper
Erreur pose covering : comment éviter et rattraper les défauts
La pose d’un covering auto est une étape cruciale pour obtenir un résultat propre, durable et esthétique. Pourtant, beaucoup d’automobilistes ou de poseurs amateurs rencontrent les mêmes difficultés : bulles, plis, mauvais alignement… Faut-il poser seul ou à deux ? Et comment corriger les erreurs les plus courantes ?
Dans cet article, Variance Auto te partage son expertise pour comprendre les différences entre la pose solo et la pose en binôme, tout en apprenant à rattraper tes erreurs sans abîmer le film.

Comprendre les différences entre pose solo et pose à deux
Avant de parler d’erreurs, il faut bien saisir les avantages et les limites de chaque méthode. Poser un covering seul ou à deux change radicalement la façon de manipuler le film. L’un favorise l’autonomie, l’autre la précision et la rapidité.
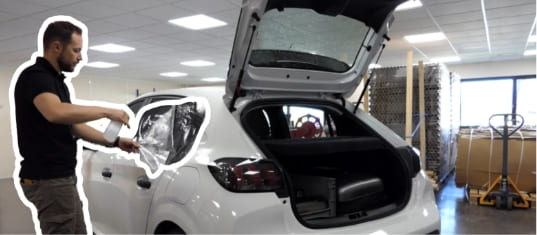
Pose solo : liberté mais exigence
La pose solo est souvent choisie par les bricoleurs aguerris. Elle offre une grande liberté de mouvement et permet de travailler à son rythme. Cependant, elle exige une excellente préparation et une bonne connaissance du covering. Une erreur de tension ou un mauvais angle peuvent vite créer des bulles d’air ou des plis difficiles à rattraper.
Pose à deux : coordination et efficacité
Travailler à deux permet de mieux gérer les grandes surfaces et les courbes complexes. L’un tient, l’autre maroufle. Cette méthode réduit les risques d’erreurs de positionnement et assure une application plus homogène. Le revers de la médaille ? Elle demande une bonne coordination et une communication fluide. Une mauvaise synchronisation peut entraîner des tensions inégales ou des raccords visibles.

Les erreurs les plus fréquentes lors d’une pose de covering
Certaines erreurs reviennent souvent, que la pose soit faite seul ou à deux. Les erreurs de pose de covering proviennent souvent d’un manque de préparation ou d’une mauvaise manipulation du film.
Mauvaise préparation de la surface
La propreté de la carrosserie est essentielle. Toute poussière ou trace empêche le film d’adhérer correctement.
Notre solution : toujours dégraisser la surface avec une solution isopropylique avant la pose.
Tension excessive du film
Trop étirer le film pour épouser les formes peut l’endommager ou provoquer un décollement prématuré.
Notre solution : chauffer le film modérément (environ 40–50 °C) avec un sèche-cheveux ou un décapeur thermique et travailler progressivement.
Bulles d’air et plis
Ces erreurs visuelles gâchent le rendu final et réduisent la durée de vie du covering.
Notre solution : percer les bulles avec un stylo perce-bulle et maroufler de nouveau doucement avec un maroufle en feutrine.
Mauvais recouvrement des raccords
Un film mal aligné crée des différences de teinte ou de texture.
Notre solution : toujours prévoir un léger chevauchement et travailler avec une bonne lumière pour détecter les défauts.

Comment rattraper une erreur de pose covering
Heureusement, la plupart des erreurs peuvent être corrigées avec les bons gestes. Rattraper une erreur sans abîmer le film demande de la patience et une bonne compréhension du matériau. Voici comment agir selon le type d’erreur rencontré.
Bulles ou plis
Chauffe doucement la zone à corriger avec un décapeur thermique (40–60 °C). Utilise ensuite une raclette souple pour lisser le film du centre vers les bords.
Mauvais alignement
Décolle lentement le film, réchauffe-le légèrement pour le détendre, puis repositionne-le. Si la colle a déjà pris, remplace simplement le morceau concerné.
Film endommagé
En cas de déchirure ou d’étirement excessif, mieux vaut découper la zone abîmée et poser un nouveau morceau en raccord invisible.
Les avantages et limites de chaque méthode


Erreurs à éviter absolument
Certaines erreurs peuvent ruiner ton covering, même si le reste de la pose est soigné.
- Travailler en extérieur par temps froid ou venteux
- Négliger le nettoyage de la carrosserie
- Surchauffer le film (risque de déformation)
- Utiliser une raclette inadaptée ou sale
- Couper le film trop court sans marge de sécurité

Conseils pro pour une pose réussie
Quelques bonnes pratiques simples permettent d’obtenir un résultat professionnel sans stress.
- Préparer un espace propre et bien éclairé
- Prévoir un thermomètre infrarouge pour contrôler la chauffe
- Tester la tension du film sur une chute avant application
- Toujours commencer par les zones les plus planes
- Finir par les contours et angles, avec une chauffe douce et uniforme
Corriger une erreur de pose covering est possible, mais demande du temps et de la minutie. En revanche, une préparation soignée, une surface impeccable et une pose à deux bien coordonnée évitent la plupart des problèmes.
Chez Variance Auto, nous recommandons toujours de s’exercer sur de petites pièces avant d’attaquer un covering complet.
FAQ
1. Peut-on poser un covering seul ?
Oui, mais cela demande de l’expérience et une préparation minutieuse. Pour les grandes surfaces, mieux vaut travailler à deux.
2. Comment éviter les bulles d’air sous un covering ?
Nettoye parfaitement la surface, chauffe légèrement le film et maroufle du centre vers l’extérieur.
3. Que faire si le film se décolle après la pose ?
Réchauffe doucement la zone et appuye fermement pour réactiver la colle. Si le problème persiste, remplace la section.
4. Un covering peut-il être repositionné ?
Oui, tant que la colle n’a pas complètement adhéré. Travaille à température modérée pour éviter la déformation.
5. Quelle température idéale pour poser un covering ?
Entre 20 °C et 25 °C en environnement sec et sans poussière, avec une chauffe du film autour de 40–50 °C.