Le 10/03/2025
rédigé par Laura P
L’été approche : 3 bonnes raisons d’installer votre film teinté maintenant !
Posez votre film teinté dès maintenant
Le printemps et l’été arrivent à grands pas et avec eux, les fortes chaleurs ! Vous envisagez d’installer un film teinté sur les vitres de votre voiture ? Excellente idée ! Non seulement cela améliore le confort en réduisant la chaleur et l’éblouissement, mais cela ajoute aussi une touche de style à votre véhicule.
Si vous hésitez encore sur le bon moment pour passer à l’action, voici 3 bonnes raisons d’installer votre film teinté dès maintenant !

Une température idéale pour une pose parfaite
La pose d’un film teinté requiert une température ni trop chaude, ni trop froide (entre +15 et +25°C). Le printemps et le début de l’été sont parfaits, car la chaleur ambiante facilite l’adhésion du film tout en évitant les complications liées à une chaleur importante, voire une canicule.
Les étapes clés d'une pose de film teinté réussie
La préparation du matériel
Avant de commencer la pose de votre film teinté, il est primordial d’avoir les bons équipements, à savoir :
- Votre film teinté prédécoupé ou à la découpe à la bonne teinte, selon vos envies ;
- Une solution d’eau savonneuse ;
- Une éponge propre ;
- Une raclette en caoutchouc ;
- Un cutter ;
- Un chiffon en microfibres doux et propre.
Retrouvez tout le matériel adéquat !
 pour pose à diluer - Variance Auto")


** prix unitaire pour l'achat du plus grand lot proposé.
Le nettoyage minutieux des vitres
- Nettoyez soigneusement la vitre intérieure avec la solution savonneuse et l'éponge ;
- Retirez toutes les poussières et résidus à l’aide du chiffon propre ;
- Utilisez la raclette pour enlever toute trace d’humidité.
La découpe et l'ajustement du film teinté
Si votre film teinté n’est pas déjà prédécoupé et thermoformé :
- Placez-le sur la vitre extérieure (face protectrice vers vous) ;
- Découpez grossièrement le film en laissant une marge de quelques millimètres.
Si votre film est déjà prédécoupé vous n’avez qu’à l’inonder d’eau savonneuse puis le poser sur votre vitre.
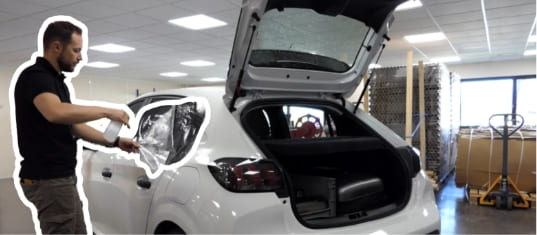
L' application du film teinté
Que vous souhaitiez poser un film teinté sur votre lunette arrière, vos vitres latérales ou sur des vitres sans montants, la technique de pose reste sensiblement identique :
- Vaporisez généreusement la vitre intérieure avec la solution savonneuse ;
- Décollez délicatement la pellicule protectrice du film ;
- Appliquez le film teinté sur la vitre encore humide ;
- À l’aide de la raclette, chassez délicatement les bulles d’air du centre vers les bords ;
- Ajustez le film teinté en cas de besoin pour un alignement parfait.
⚠️ Attention : Laissez sécher le film sans le toucher pendant 24 à 48h. Ne pas descendre la vitre.
Avec des températures modérées, le film s’ajuste mieux à la surface de la vitre et la pose devient plus facile.

Une évaporation rapide pour un résultat impeccable
Lorsque vous appliquez un film teinté, il est normal d’observer quelques bulles d’eau sous la surface. Pas de panique ! Ces bulles disparaissent en s’évaporant naturellement au fil des jours.
En installant votre film au printemps, le processus d'évaporation est accéléré par la chaleur. Résultat ? Un fini parfait plus rapidement !
Mais attention, comme mentionné précédemment, évitez de baisser vos vitres pendant au moins 48h afin de laisser le film bien adhérer !

Vous avez le temps
Installer un film teinté demande de la patience et de la précision. En vous y prenant dès maintenant, vous pourrez prendre votre temps et travailler sans pression.
Si vous êtes novice, pas d’inquiétude ! Nos films sont conçus pour être posés facilement, même par les débutants. Pour vous aider, nous mettons à disposition des tutoriels vidéo sur nos réseaux sociaux Instagram, Facebook, YouTube et TikTok. 📲
Alors, qu'attendez-vous ? Passez à l’action, profitez des avantages qu'offre un kit film teinté et offrez à votre voiture un nouveau look tout en gagnant en confort cet été ! 🚘✨
D'autres problématiques en rapport
-

FAQ vitres teintées : Nos questions / réponses les plus fréquentes
-

Être en sécurité dans votre van en Afrique : le cas de Los Mundos
-

Le film solaire pour voiture : la meilleure solution contre la chaleur
-

Le kit vitres teintées : avantages, faire le bon choix et réglementation
-

Nos clients ont du talent : les kits vitres teintées