Le 15/01/2024
rédigé par Alice O.
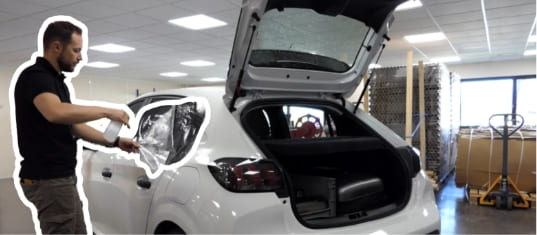
Comment poser du PPF : Le guide technique de l'expert
Découvrez en vidéo la méthode pour appliquer votre film PPF anti-rayures.
Apprends à poser un film PPF sur ta voiture. Décontamination, pose humide, marouflage et découpe à ras : la méthode d'atelier détaillée étape par étape.
Tuto : Réussir sa pose de film pour protection de carrosserie
Nettoyage et dégraissage au millimètre
Passe le véhicule au lavage complet. Séche-le puis dégraisse la zone exposée (capot, pare-chocs, rétroviseurs) avec de l'alcool isopropylique.Insiste dans les interstices, sous les boudins de joints et sur les retours d'ailes. La graisse empêche l'adhésif de fixer sur les bords.

Pose du fil de découpe
Pour éviter tout risque de rayer la peinture lors du détourage, installe un fil de découpe le long des arêtes et des contours. C'est la garantie technique d'une découpe à ras ultra propre sans risquer d'entailler le vernis.

Laisse apparaître un excédent de 5 à 10 centimètres au début et à la fin : tu auras plus d'aisance lorsque tu le retireras.
La préparation du PPF
Pulvérise la solution de pose sur la carrosserie nettoyée. Retire le liner de protection du PPF tout en imbibant généreusement la face adhésive au fur et à mesure. Plus la surface est mouillée, plus le positionnement est facile.

Prends soin de laisser le deuxième liner de protecteur transparent qui protège le film PPF pendant la pose. Il protègera le film pendant le marouflage.
La pose pour les petites surfaces
Positionne le PPF sur la surface que tu souhaites équiper. Retire le liner de protection progressivement. À l’aide d’une raclette, maroufle le film du centre vers les bords pour évacuer les quelques bulles d’air.
Important : Laisse environ 3 cm de débord après le fil de découpe. Ce surplus est nécessaire pour que la coupe soit bien réalisée.

Grâce à sa flexibilité, tu peux étirer le film PPF pour qu’il épouse les courbes du support. Pour les formes difficiles, tu peux chauffer très légèrement le film à l’aide d’un décapeur thermique ou d’un sèche-cheveux.
La pose pour les grandes surfaces
Pulvérise de l’eau savonneuse sur la carrosserie et sur le côté encollé du PPF. Positionne le film sur la surface et maroufle à l’aide d’une raclette souple du centre vers les bords pour évacuer l’eau savonneuse.

Comme pour les petites surfaces, étire le film pour l'adapter au support. Veille aussi à bien laisser un surplus de 3 centimètres derrière le fil de découpe.
Le retrait du fil de découpe
Maroufle minutieusement sur le fil de découpe pour améliorer l'accroche lors du découpage. Saisis l'extrémité du fil de découpe et retire le liner vert pour ne garder que le fil.
Avec ton pouce, maintient fermement le liner vert pour amorcer la découpe en tirant sur le fil. Tire sur le fil en longeant la ligne de découpe en étant bien plaqué contre la carrosserie.
Dégage l'excédent de film ainsi que le liner vert.

Les finitions
Découpe les parties superflues à l’aide d’un cutter avec une lame neuve pour ne pas endommager la carrosserie. Retire le liner protecteur transparent.
Si tu as opté pour un kit individuel ou kit complet, tu n'as pas besoin de réaliser cette étape.
Une fois le travail achevé, laisse le véhicule au repos. Le temps de polymérisation demande 48 à 72 heures. C'est le délai nécessaire pour que l'humidité résiduelle s'évapore et que la force d'adhérence soit maximale. Un film de qualité résiste aux lavages répétés, ne jaunit pas sous les UV et vieillit proprement s'il est posé dans les règles de l'art.
La pose est maintenant terminée ! Votre véhicule est maintenant protégé des frottements et projectiles.
Savoir poser PPF sur un véhicule demande du matériel adapté, de l'exigence et une méthode rigoureuse. De la décontamination initiale à la pose, en passant par le marouflage et le détourage précis, chaque étape influe sur le rendu final. Un film polyuréthane doté d'un top coat hydrophobe garantit une absorption des impacts redoutable et une stabilité dans le temps irréprochable. En respectant le temps de polymérisation, tu obtiens un film qui ne marque pas et qui protège le vernis pour longtemps.


 ?")