Le 12/07/2023
rédigé par Alice O.
Comment poser un covering auto ?
Particulier ou professionnel, la pose de covering est accessible à tous.
Le covering ou wraping n'est pas réservé qu'aux professionnels de la pose. La méthode de pose est identique quelque soit le modèle de véhicule. Avec les bons gestes et les bonnes astuces, le procédé est accessible à tous ;)
Pour réussir vous-même la pose de votre film adhésif pour covering pour voiture ou pour moto, prenez connaissance de la marche à suivre !

Choisissez le type de covering qui correspond à votre projet.
Le type de covering est à choisir avec attention en fonction de votre projet.
Si vous souhaitez poser un total covering, privilégiez sans hésiter le covering 3D. Il sera parfait pour être thermoformé sans difficulté. Il épousera les courbes de votre véhicule et rendra la pose plus facile.
Si vous préférez un covering partiel type géométrique sur des surfaces planes, partez sur du covering 2D. Cette finition s'applique sur les surfaces lisses de votre carrosserie comme un toit, un capot, un arrière-coffre, un pare-chocs ou un rétroviseur. Il est moins thermoformable, ce qui le rend adapté aux surfaces plates et aux covering en détails.
Vous trouverez nos conseils pour poser un covering auto dans ce guide, peut importe le type de véhicule ! La bonne pratique, c'est aussi de prendre le temps de visionner nos vidéos tutoriels, pour vous aider dans votre projet.

Les étapes de pose de covering
C’est le jour J ! Vous tenez entre vos mains le film de covering auto de vos rêves. Patience, certaines étapes sont indispensables pour un résultat exceptionnel.
Quelques précautions sont à respecter avant de débuter :
- Respecter la température idéale d'application : entre +15°C et +25°C ;
- Poser à l'abri de la poussière et du vent ;
- Nous conseillons de rentrer la voiture à l'abri, la veille de la pose, pour éviter que la carrosserie soit froide.
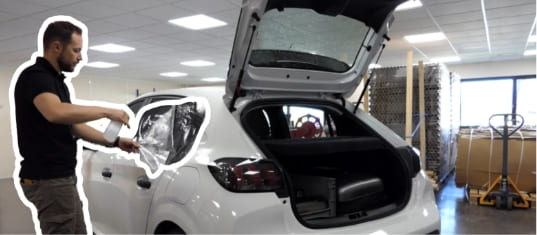
La pose d’un covering auto ou d'un covering moto nécessite une préparation parfaite de la carrosserie.
- Nettoyez minutieusement la surface à équiper ainsi que les contours avec de l’alcool isopropylique. Ce produit nettoiera et dégraissera en profondeur votre véhicule sans l’abîmer. Appliquez l'alcool isopropylique à l'aide d'un chiffon en effectuant des mouvements circulaires ;
- Prédécoupez votre covering avec les formes que vous souhaitez. Veillez à laisser plusieurs centimètres de marge ;
- Retirez le liner de protection, à environ ¼ du film de covering ;
- Appliquez la partie adhésive directement sur la surface ;
- Déroulez tout doucement le reste du liner de protection afin que tout le film de covering soit posé ;
- Utilisez un décapeur thermique sur les zones à relief. Cette action va thermoformer le film de covering pour qu’il s’adapte parfaitement à votre véhicule ;
- Aidez-vous d’une raclette pour maroufler votre covering, du centre vers les extrémités. Vous chasserez ainsi toutes les bulles d’air ;
- Effectuez les découpes de finition avec une lame de cutter.
Astuce : Chauffez le film grâce au thermoformage, afin d’avoir un résultat impeccable !
Facilitez-vous la pose !
Il n'y a pas de secrets : Pour bien travailler, il faut de bons outils. Equipez-vous avec du matériel de qualité pour réaliser vos poses dans les meilleures conditions !


** prix unitaire pour l'achat du plus grand lot proposé.

J'ai des bulles sur mon covering : Comment faire ?
Pas de panique. Les bulles peuvent apparaître lors de la pose, et ça peut arriver à tout le monde !
L'astuce pour enlever les bulles est simple. Prenez un stylo perce-bulle d'air et percez la bulle pour faire échapper l'air à l'intérieur. Ensuite, marouflez fermement pour lisser la bulle.
Et voilà, le tour est joué :)
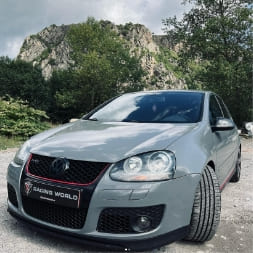
Notre sélection des plus belles poses de la commu'


Ne doutez plus et lancez-vous !
Suivez ces étapes et regardez nos vidéos tutoriels sur nos réseaux sociaux comme Instagram, Facebook, TikTok et YouTube. Grâce à tout ça, vous réussirez sans aucun doute l’application de votre film de covering pour voiture !
N'hésitez pas à échanger avec la communauté ou avec des amis pour être accompagné pendant la pose.
Un doute ? Une question ? Nos experts sont disponibles pour vous conseiller, alors n’hésitez pas à les contacter !
Pour la touche fatale sur votre carrosserie


Modernisez votre véhicule avec les coverings 3M


D'autres problématiques en rapport
-

Covering : Airflow, air escape, nid d'abeille, bubble free.. Qu'est-ce que c'est ?
-

Comment poser un covering sur un pare choc ?
-

Préparer son véhicule avant la pose de covering
-

Erreur de pose covering : diagnostiquer les problèmes et trouver la solution adaptée
-

Sublimez votre Megane avec un toit noir en toute simplicité !