Le 08/04/2025
rédigé par Laura P
Comment nous avons relooké une Tesla S avec un covering rouge brillant
Covering sur une Tesla : un nouveau look rouge brillant
Chez Variance Auto, on aime quand les voitures brillent de mille feux ✨ Et quand une Tesla S entre dans nos locaux… on sort le grand jeu ! Pour lui offrir un look unique, nous avons fait appel à une experte du covering, la talentueuse Charlène VERSCHUEREN. Découvrez dans cet article comment s’est déroulée cette transformation, et profitez de nos conseils pour réussir votre covering Tesla.

Charlène Verschueren : L'artiste derrière le volant
Pour relooker notre Tesla S, nous avons eu la chance d’accueillir Charlène, fondatrice du centre VRS Covering. Dès son arrivée, une chose était claire : elle vit pour l’esthétique automobile !
Charlène, c’est la précision incarnée. Son œil expert et son amour du détail font d’elle une véritable artiste du covering. Sa mission ? Sublimer chaque véhicule tout en le protégeant, et ce, toujours dans le respect des attentes de ses clients. Que ce soit pour une citadine, une sportive ou un SUV, elle transforme chaque projet en une œuvre unique.
Charlène ne se contente pas de poser du covering ; elle insuffle une nouvelle vie à chaque véhicule qui passe entre ses mains grâce au PPF et au nettoyage premium de véhicule. Ensemble, nous avons choisi un covering rouge brillant, pour un look audacieux, élégant et résolument moderne. Et le résultat ? Bluffant !

Nos conseils pour un covering Tesla réussi
Vous envisagez de relooker votre Tesla S avec un covering ? Excellente idée ! Non seulement cela change radicalement le style de votre voiture, mais en plus, cela protège sa peinture d’origine.
Comme mentionné précédemment, nous avons choisi un covering rouge brillant. Pourquoi nous avons choisi celui-ci ? Pour les raisons suivantes :
- Sa texture brillante ;
- Sa gamme 3D (c'est-à-dire qu'il est thermoformable) ;
- Son rouge éclatant ;
- Sa durée de vie pouvant atteindre 6 ans.
Si vous avez envie de sauter le pas d'un covering, voici les étapes détaillées de la pose d’un covering, comme nous l’avons fait sur notre Tesla S, avec l’aide de Charlène. On vous explique tout, étape par étape, pour un rendu pro.
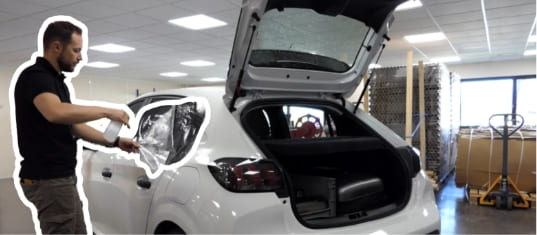
Étape 1 : Nettoyage et préparation du véhicule
Avant de poser quoi que ce soit, le véhicule doit être irréprochable niveau propreté. Un film mal posé sur une surface sale peut vite se décoller ou former des bulles. Ce qu’il faut faire :
- Placez la voiture dans un endroit fermé, propre et sans courant d'air avec une température comprise entre 15°C et 25°C ;
- Lavez la carrosserie à la main avec une solution isopropylique pour retirer toutes les impuretés ;
- Bien rincer puis sécher entièrement (même les joints, coins, poignées…) avec un chiffon en microfibre propre et doux ;
💡 Astuce : démontez certains éléments (poignées, logos, rétros) pour faciliter la pose et éviter les raccords visibles.
Étape 2 : Préparation du covering
Le covering doit être manipulé avec soin. Avant la pose, on prépare les morceaux à appliquer en mesurant et en les découpant chaque morceau en laissant une marge de 5 à 10 cm.
Étape 3 : Pose du covering
C’est là que la magie opère ! C’est une étape qui demande de la patience et beaucoup de précision. Voici la technique de pose que nous et Charlène vous conseillons :
- Positionnez à blanc du covering sur la partie de la voiture à recouvrir ;
- Retirez progressivement le liner de protection au dos du covering ;
- Appliquez puis marouflez le covering du centre vers les bords avec une raclette en feutrine ;
- Utilisez un pistolet thermique pour assouplir le covering afin qu'il épouse les formes de la voiture (courbes, creux, bords…) ;
- Chassez une dernière fois les bulles d’air avec la raclette en les dirigeant vers l’extérieur
💡 Astuce : Travailler à deux facilite grandement la pose, surtout sur les grandes surfaces comme le capot ou le toit.
Étape 4 : Travail des détails et finitions
Le covering est maintenant en place, mais ce n’est pas fini ! Pour que le résultat soit impeccable et durable, place aux finitions :
- Découpez précisément les bords avec un cutter spécifique (lame neuve obligatoire) ;
- Chauffez les bords (à 90°C environ) pour fixer durablement le covering ;
- Replacez les éléments précédemment démontés (logos, poignées…) ;
- Inspectez minutieusement toute la voiture en quête de potentielle bulles, plis, décollements. Si tel est le cas, un coup de raclette suffira.
⚠️ Un bon covering doit être “invisible” : pas de traces de raclette, pas de plis, pas de coupures visibles.
Étape 5 : Nettoyage final et conseils d’entretien
Une fois le covering posé, on redonne un coup de propre à la voiture pour qu’elle brille de mille feux grâce à un nettoyage léger avec un produit sans solvant.
⚠️ Ne pas laver votre véhicule pendant les 5 à 7 jours qui suivent, ensuite utilisez uniquement des produits adaptés au covering pour les lavages futurs (évitez les rouleaux automatiques).
Un résultat qui en met plein les yeux

Relooker votre Tesla S avec un covering, c’est l’assurance de rouler dans un véhicule à votre image, tout en le protégeant durablement. Et grâce à l’expertise de Charlène et nos conseils pratiques, vous avez maintenant toutes les clés pour réussir votre covering Tesla.