Le 13/02/2024
rédigé par Alice O.
Comment poser des bandes de balisage sur mon véhicule ?
Découvrez ce tutoriel "pas-à-pas" pour installer votre film de balisage.
Vous avez besoin d'installer des bandes de signalisation sur votre véhicule, mais vous ne savez pas comment vous y prendre ?
Sachez qu'il est possible de commander du film de balisage, et de le poser vous-même !
Découvrez dans cet articles les étapes à respecter pour poser vos bandes de signalisation sur votre carrosserie.
Tuto : Comment poser un film de balisage ?
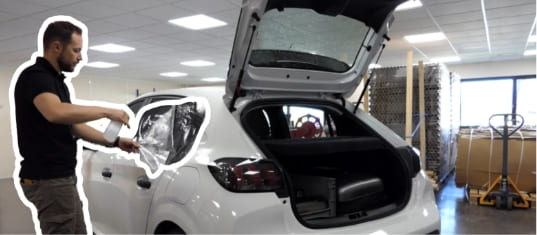
Préparation du véhicule pour la pose
Nettoyez minutieusement la surface à équiper à l’aide d’alcool isopropylique pour décaper et dégraisser la carrosserie.
Appliquez l’alcool isopropylique à l’aide d’un chiffon en effectuant des mouvements circulaires.
Nous vous conseillons de pré-découper vos bandes de balisage aux dimensions souhaitées pour ne pas avoir à le faire directement sur la carrosserie.
Appliquez la bande de signalisation - Pour pose à l'eau
Pulvérisez abondamment d’eau savonneuse la carrosserie et la partie adhésive du film de balisage avant l’application.
Si besoin, pour une découpe propre, nous vous conseillons d'utiliser du fil de découpe épais.
Positionnez ensuite les bandes de balisage à leur place définitive sur la carrosserie, puis marouflez fermement du centre vers l’extérieur pour chasser l’eau et les bulles.
La pose à l’eau vous permet d’avoir une flexibilité sur l’adhérence du film et de le repositionner si nécessaire.
Appliquez la bande de signalisation - Pour pose à l'eau
Positionnez la bande de balisage à sa place sur la carrosserie et accrochez-la grâce à du scotch spécial carrosserie. Cela servira à maintenir la bande en place lors de son application.
Si besoin, pour une découpe propre, nous vous conseillons d'utiliser du fil de découpe épais.
Retirez ensuite une petite partie du haut liner de protection puis déroulez le film doucement en suivant le sens de la bande, tout en marouflant fermement du centre vers l’extérieur.
Ce type de pose ne permet pas de réajuster le positionnement de la bande, le scotch de maintien est donc indispensable !
Finition de la pose
Une fois la bande de balisage à sa place, repassez un coup de maroufle pour chasser les dernières éventuelles bulles d’air, toujours du centre vers l’extérieur.
Rabattez le film vers l’intérieur (si possible) pour une meilleure adhérence et une belle finition.
Cette étape permet de garantir une bonne durabilité et prévient contre les infiltrations d’eau.
La pose est terminée !
Votre véhicule est maintenant prêt à rouler homologué en toute sécurité !
Le film de balisage peut être retiré à tout moment sans laisser de traces ou de résidus sur la peinture d’origine.
Nettoyage et entretien
Ne pas nettoyer dans les 48 heures suivant l’application.
Pour éviter de rayer le produit, il est conseillé de commencer le nettoyage par un rinçage à l’eau claire, et à faible pression, pour dépoussiérer la surface.
Nettoyer ensuite à l’aide d’une éponge douce et d’eau, éventuellement additionnée d’un détergent doux.
Pour un nettoyage haute pression : le jet d’eau doit former un angle de 90 ° avec la surface. Ne pas rester statique sur une zone.
- Pression maximale : 75 bars
- Température maximale : 50 °C
- Distance entre le jet d’eau et le chevron rétroréfléchissant : minimum 1 mètre.