Le 20/01/2025
rédigé par Laura P
Comment bien appliquer une bande de balisage sur votre véhicule ? 🚛✨
Nos astuces pour bien poser une bande de balisage
Vous êtes propriétaire d’un camion ou d’un véhicule utilitaire, et vous souhaitez améliorer sa visibilité tout en respectant la réglementation ? La bande de balisage est votre alliée idéale ! Dans cet article, nous vous expliquons tout ce que vous devez savoir pour l’appliquer correctement, et nous vous donnons accès à nos vidéos tutoriels pour devenir un(e) pro du balisage !

Qu’est-ce qu’une bande de balisage et pourquoi est-elle indispensable ? 🛠️
La bande de balisage pour véhicule est un adhésif rétro-réfléchissant spécialement conçu pour améliorer la visibilité de votre camion ou utilitaire. Elle joue un rôle essentiel, et dispose de nombreux avantages, tels que :
- La sécurité renforcée : Grâce à son effet réfléchissant, elle réduit considérablement les risques d’accidents, surtout de nuit ou par mauvais temps. 🌙🌧️
- L'esthétique : En plus d’être pratique, elle donne un look professionnel et soigné à votre véhicule. 🚛✨
Un petit investissement pour une grande tranquillité d’esprit, non ? 😊
Que dit la loi sur l'installation d'une bande de balisage ?
Pour être en conformité avec la réglementation, voici les exigences légales concernant l’application des bandes de balisage sur un véhicule utilitaire :
- À l’avant
- Deux bandes de balisage doivent être posées, chacune ayant une surface minimale de 0,16 m².
- Les hachures doivent être orientées vers l’extérieur à partir du centre du capot.
- À l’arrière
- Appliquez deux bandes verticales et deux bandes horizontales, avec une surface totale minimale de 0,32 m².
- Sur les côtés
- Une bande de balisage d’au moins 0,16 m² est requise de chaque côté du véhicule.
En France, certaines catégories de véhicules, comme les poids lourds, doivent obligatoirement porter ces bandes pour se conformer au Code de la route. 🚨

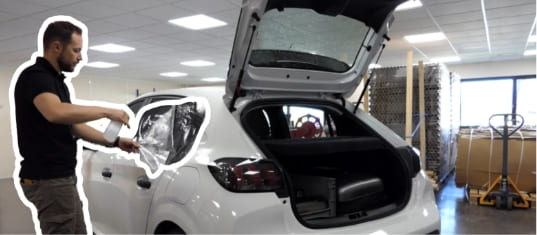
Comment bien appliquer une bande de balisage sur votre véhicule ? 🖐️🎯
Pas de panique, appliquer une bande de balisage, c’est à la portée de tous avec un peu de patience et quelques astuces !
Recommandations pour la pose de bandes de balisage
- Positionnement optimal :Évitez d’appliquer la bande de signalisation sur les parties fortement galbées de la carrosserie pour assurer une bonne adhérence et une durabilité optimale.
- Espacement par rapport aux bords :Posez le film de balisage à au moins 5 mm des bords extérieurs de la carrosserie afin d’éviter tout risque de décollement.
- Pose des bandes :Ne superposez pas deux bandes de signalisation. Préférez une pose bord à bord pour un résultat propre et conforme.
L'installation d'une bande de balisage
Voici nos étapes clés pour un résultat impeccable 👌 :
- Installez-vous dans un endroit adéquat : Travaillez dans un environnement sec et à température modérée (entre 15 et 25 degrés) pour que l’adhésif adhère parfaitement.
- Préparez la surface : Nettoyez soigneusement la carrosserie de votre véhicule avec de l’alcool isopropylique et un chiffon doux. Il faut une surface propre et sèche pour une adhérence optimale. 🧼🚗
- Appliquez la bande progressivement : Pulvérisez de l'eau savonneuse sur la surface où sera installée la bande de balisage ainsi que sur la partie adhésive de la bande.
- Lissez la surface : Utilisez une raclette pour bien plaquer l’adhésif et chasser les bulles d'air et l'eau restante. Cette manœuvre a pour but de chasser l'eau et ✨
💡 Recommandation après la pose :
- Laissez la colle polymériser correctement en évitant de laver le véhicule dans les 8 jours suivants la pose.
- Conservez le véhicule dans un endroit sec, avec une température idéale supérieure à 10 °C pour garantir une application réussie.
Et voilà, votre véhicule est maintenant conforme, sécurisé et bien visible. Admirez le résultat ! 👏
Vous souhaitez des conseils et des astuces pratiques pour maîtriser l’art de l’application des bandes de balisage ? Nous avons ce qu’il vous faut ! Suivez-nous sur nos réseaux sociaux pour accéder à nos contenus exclusifs 👇:
- Instagram et Facebook : Des mini-tutos et des conseils en story ! 📸✨
- YouTube : Des tutoriels détaillés pour chaque étape, rien de mieux pour réussir ! 🎬🔍
- TikTok : Des astuces rapides et ludiques pour les pros comme pour les débutants. 🎶🚛
Un matériel adéquat pour une pose d'une bande de balisage réussie
Munissez-vous de nos accessoires indispensables pour réussir parfaitement l'installation d'une bande de balisage sur votre véhicule.

 pour pose à diluer - Variance Auto")


** prix unitaire pour l'achat du plus grand lot proposé.
L'entretien d'une bande de balisage
Suivre ces recommandations permettra de préserver la qualité et l’efficacité de vos bandes de balisage ! 🚛✨
1/ Attente après application : Ne nettoyez pas le véhicule dans les 48 heures suivant la pose pour permettre une adhérence optimale du produit.
2/ Précautions pour éviter les rayures :
- Commencez toujours par un rinçage à l’eau claire, avec une faible pression, pour éliminer la poussière sans endommager la surface.
- Nettoyez ensuite avec une éponge douce et de l’eau, en y ajoutant éventuellement un détergent doux.
3/ Utilisation d’un nettoyeur haute pression :Si vous optez pour un nettoyage à haute pression, respectez les consignes suivantes :
- Maintenez le jet d’eau perpendiculaire (90°) à la surface pour éviter tout dommage.
- Ne restez pas statique sur une zone.
- Pression maximale : 75 bars.
- Température maximale : 50 °C.
- Distance minimale entre le jet et le chevron rétro-réfléchissant : 1 mètre.
Prêt(e) à passer à l’action ? 🚀
Avec ces conseils et nos tutoriels, appliquer une bande de balisage sur votre véhicule devient un jeu d’enfant. Pensez à toujours respecter les normes en vigueur pour rouler en toute sérénité. Et si vous avez des questions, n’hésitez pas à nous contacter, notre équipe est là pour vous guider. 😊
Alors, prêt(e) à donner un look professionnel et sécurisé à votre véhicule ? 🚚✨