Le 10/01/2024
rédigé par Alice O.
Comment poser un covering sur un pare choc ?
Découvrez nos conseils pour réussir la pose de covering sur un pare-choc.
Vous êtes l'heureux propriétaire d'un covering auto, mais vous ne savez pas vraiment comment l'appliquer sur votre pare-choc ?
Grâce à ce tuto de pose, découvrez pas-à-pas (et en vidéo) nos astuces et conseils de pose pour covering sur pare-choc !
Nos conseils pour réussir une pose de covering sur un pare-choc
Vérifiez les conditions de pose
- Appliquez dans un environnement entre +15°C et +25°C.
- Protégez le véhicule des éléments qui peuvent le salir (terre, vent, poussière)
- Pour que la carrosserie soit à bonne température, nous conseillons de rentrer le véhicule la veille.

Nettoyez bien votre véhicule avant la pose
Comme pour n'importe quelle partie de la voiture, la surface à adhésiver doit être parfaitement propre et dégraissée. Pour éliminer toutes traces d'impuretés, munissez-vous de :
- Alcool isopropylique
- Chiffon doux
- Pulvérisateur
- Solution savonneuse + Eau claire

Pensez à nettoyer les contours ; certaines poussières peuvent s'y loger.
Installez le fil de découpe sur les bords du pare-choc
Veillez à installer le fil de découpe bien au bord du pare-choc, de manière à ce que le pare-choc soit complètement adhésivé une fois le fil retiré.
Vous pouvez choisir un fil de découpe fin ou un fil de découpe épais.

Pensez à laisser quelques centimètres de surplus de chaque côté, pour pouvoir tirer le film facilement en fin de pose.
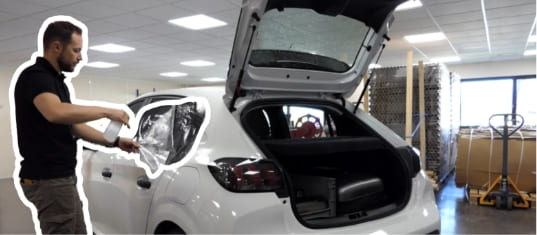
Appliquez votre covering sur la carrosserie
- Placez le covering au bon endroit, et maintenez-le à l'aide de ruban adhésif ou d'aimants pour carrosserie. Cela vous aidera pendant la pose du film.
- Prenez un côté, et retirez le liner de protection sur les 15 premiers centimètres.
- Découpez un bout de liner que vous venez de décoller : Vous aurez plus de place et d'aisance pour appliquer votre film adhésif.
- À l'aide de votre main, appliquez l'adhésif sur la carrosserie. Tirez légèrement sur le film afin d'éviter les plis. Appuyez bien et insistez sur les courbures. Dans les recoins, n'hésitez pas à bien marquer le pli pour que l'adhésif adhère bien à la carrosserie.
- Une fois que les 15 premiers centimètres sont faits, vous pouvez enlever le reste du liner de protection tout en répétant l'action d'application sur la carrosserie.

Soyez patient et minutieux, pour éviter les plis. 😉 Si le covering est mal placé, décollez-le immédiatement et placez-le correctement.
Chauffez votre film covering pour qu'il s'adapte aux courbes
Grâce à un décapeur thermique, chauffez votre film afin de le ramollir. Cette action lui donnera la forme de son support, et il tiendra mieux dans le temps. Vous pouvez insister sur les reliefs à l'aide d'un gant thermique. Le rendu sera bluffant !

Effectuez des petits mouvements circulaires pour diffuser la chaleur uniformément. Cela évitera aussi au film de surchauffer.
Si besoin, découpez le covering pour laisser apparaître les radars et caméras.
Aidez-vous d'un cutter avec une lame neuve ou comme neuve afin de faire les découpes de finition. Vous pouvez vous aider de scotch pour guider votre lame (comme dans la vidéo). Attention à ne pas rayer la carrosserie !

Retirez le fil de découpe et dégagez le surplus de covering
Tirez doucement sur le surplus de fil de découpe, laissé en début de pose. En tirant, vous verrez votre covering se découper pile au niveau du fil. Enfin, décollez le surplus de covering pour ne laisser que votre pare-choc.

Laissez votre covering poser quelques heures avant d'en profiter !
Nos films covering sont adhésifs immédiatement, mais leur tenue est optimale au bout de quelques heures. Nous vous conseillons de laisser passer une journée ou une nuit avant de profiter de votre véhicule. 😉

D'autres problématiques en rapport
-

Covering sur Van, comment @vanvadrouille a customisé et personnalisé son fourgon aménagé
-

Customisez votre voiture comme dans Fast and Furious avec nos covering
-

Tout savoir sur le covering total pour voiture
-

Nos astuces de pro spécial covering
-

Guide complet et conseils d'entretien : Comment nettoyer un covering efficacement ?