Le 22/01/2024
rédigé par Alice O.
Comment poser du covering sur un capot de voiture ?
Les étapes à respecter pour réussir sa pose de covering auto sur le capot.
Le capot d'une voiture peut paraître assez simple à poser, comparé à d'autres parties avec plus de relief. Pourtant, certaines étapes doivent bien être prises en compte pour une pose réussie.
Découvrez dans ce tutoriel notre pas-à-pas pour réussir sa pose de covering sur un capot.
Pose ton covering sur ton capot - Vidéo de pose 🔥
Nettoyez parfaitement la carrosserie.
Comme n'importe quelle pose de covering, une des étapes les plus importantes (si ce n'est la plus importante) est de parfaitement nettoyer et dégraisser la surface.
Pour cela, utilisez un chiffon doux, de l'eau savonneuse et de l'alcool isopropylique.

N'oubliez pas de nettoyer les bords du capot ! De la poussière peut s'y nicher, et empêcher votre covering de bien adhérer.
Enlevez le sigle, pour avoir un capot bien lisse.
Si votre sigle est présent sur le capot, veillez à le retirer avant de poser le covering.
- Réchauffez le signe à l'aide d'un décapeur thermique pour ramollir la colle.
- Passez une ficelle entre la carrosserie et le signe pour le décoller.
- Retirez la colle restante avec de l'alcool isopropylique.

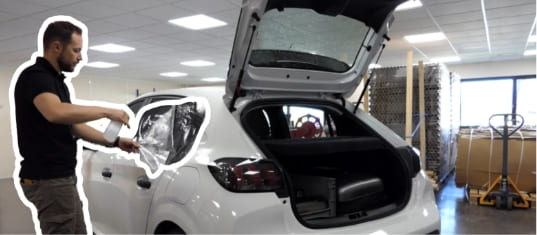
Centrez le morceau de covering sur le capot.
Lors de cette étape, vous n'avez pas encore besoin de retirer le liner de protection. L'idée est de positionner le covering à l'endroit souhaité, avant de commencer la pose.
Pour maintenir le covering sur le capot pendant la pose, vous pouvez utiliser du scotch de peintre et/ou des aimants pour carrosserie.

Vous avez un covering à motifs ? Pensez à le disposer en fonction de ceux-ci.
Si besoin, dégrossissez la coupe avant de commencer à appliquer l'adhésif.
Enlever le surplus de matière facilitera la pose. Vous pourrez mieux tirer sur le covering, pour l'appliquer correctement.
Veillez quand même à garder au moins 20 à 30 centimètres de chaque côté, pour tendre le film facilement.

Appliquez un premier côté du capot, sans appuyer.
- Repliez le covering sur sa moitié afin d'accéder au liner de protection.
- Décollez la première partie du liner de protection.
- Découpez au cutter le liner de protection que vous venez de décoller. Vous pourrez ainsi coller plus facilement le covering.
- Appliquez la première partie du covering, sans trop insister sur le marouflage.
L'objectif ici est de caler le covering, sans appuyer, pour mieux positionner la seconde partie du film dans les étapes d'après.

Appliquez la deuxième partie du covering.
Décollez la seconde partie du liner de protection, de la même manière que la première partie.
Attrapez les bords du covering et placez la deuxième partie sur le capot.

Repositionnez le covering si besoin.
Pour un rendu lisse et professionnel, repositionnez votre covering au fur et à mesure. Le film covering doit être bien tendu pendant la pose.

La technologie airflow dispose d'une colle à micro-canaux sensible à la pression : elle vous permet de décoller le film et de le replacer, tant que vous n'avez pas appuyé dessus.
Une fois que vous marouflez le film, les canaux de l'adhésif s'écraseront et votre covering ne pourra plus être repositionné.
Chauffez et marouflez votre covering pour qu'il adhère bien.
Dès que le film est bien positionné, alternez entre les phases de réchauffe et de marouflage du covering.
Balayez votre covering sans rester au même endroit pour ne pas abîmer le film adhésif.
Pensez à maroufler de l'intérieur vers l'extérieur, pour évacuer les bulles.

Appliquez le covering sur les bords en appuyant.
C'est le détail qui sublimera les finitions de votre covering. Pour bien délimiter les contours et reliefs, appuyez sur votre covering dans les angles et les creux. Marquez le pli à l'aide de vos doigts ou d'une raclette.

Juste avant la coupe, réchauffez votre covering
Après l'application, réchauffez le covering avec votre décapeur thermique pour avoir une coupe nette.

Découpez l'excédent de film avec une lame neuve.
Une lame de cutter usée risque d'abimer le covering, la finition ne sera pas très propre. Pensez à changer votre lame, et à bien suivre les contours de la carrosserie.
Ne coupez pas sur la carrosserie, mais à côté. Ensuite, retirez le covering en trop.

Soulevez le capot pour appliquer le covering sur les bords
Pour bien faire adhérer le covering, réchauffez les bords et appliquez les retours au doigt. Pour ne pas vous bruler les doigts, nous conseillons l'utilisation d'un gant thermique.
Enfin, réchauffez une dernière fois le covering pour terminer l'application.

La pose est désormais terminée !
Laissez reposer votre film covering quelques heures avant de sortir votre voiture à nouveau ;)